Camera
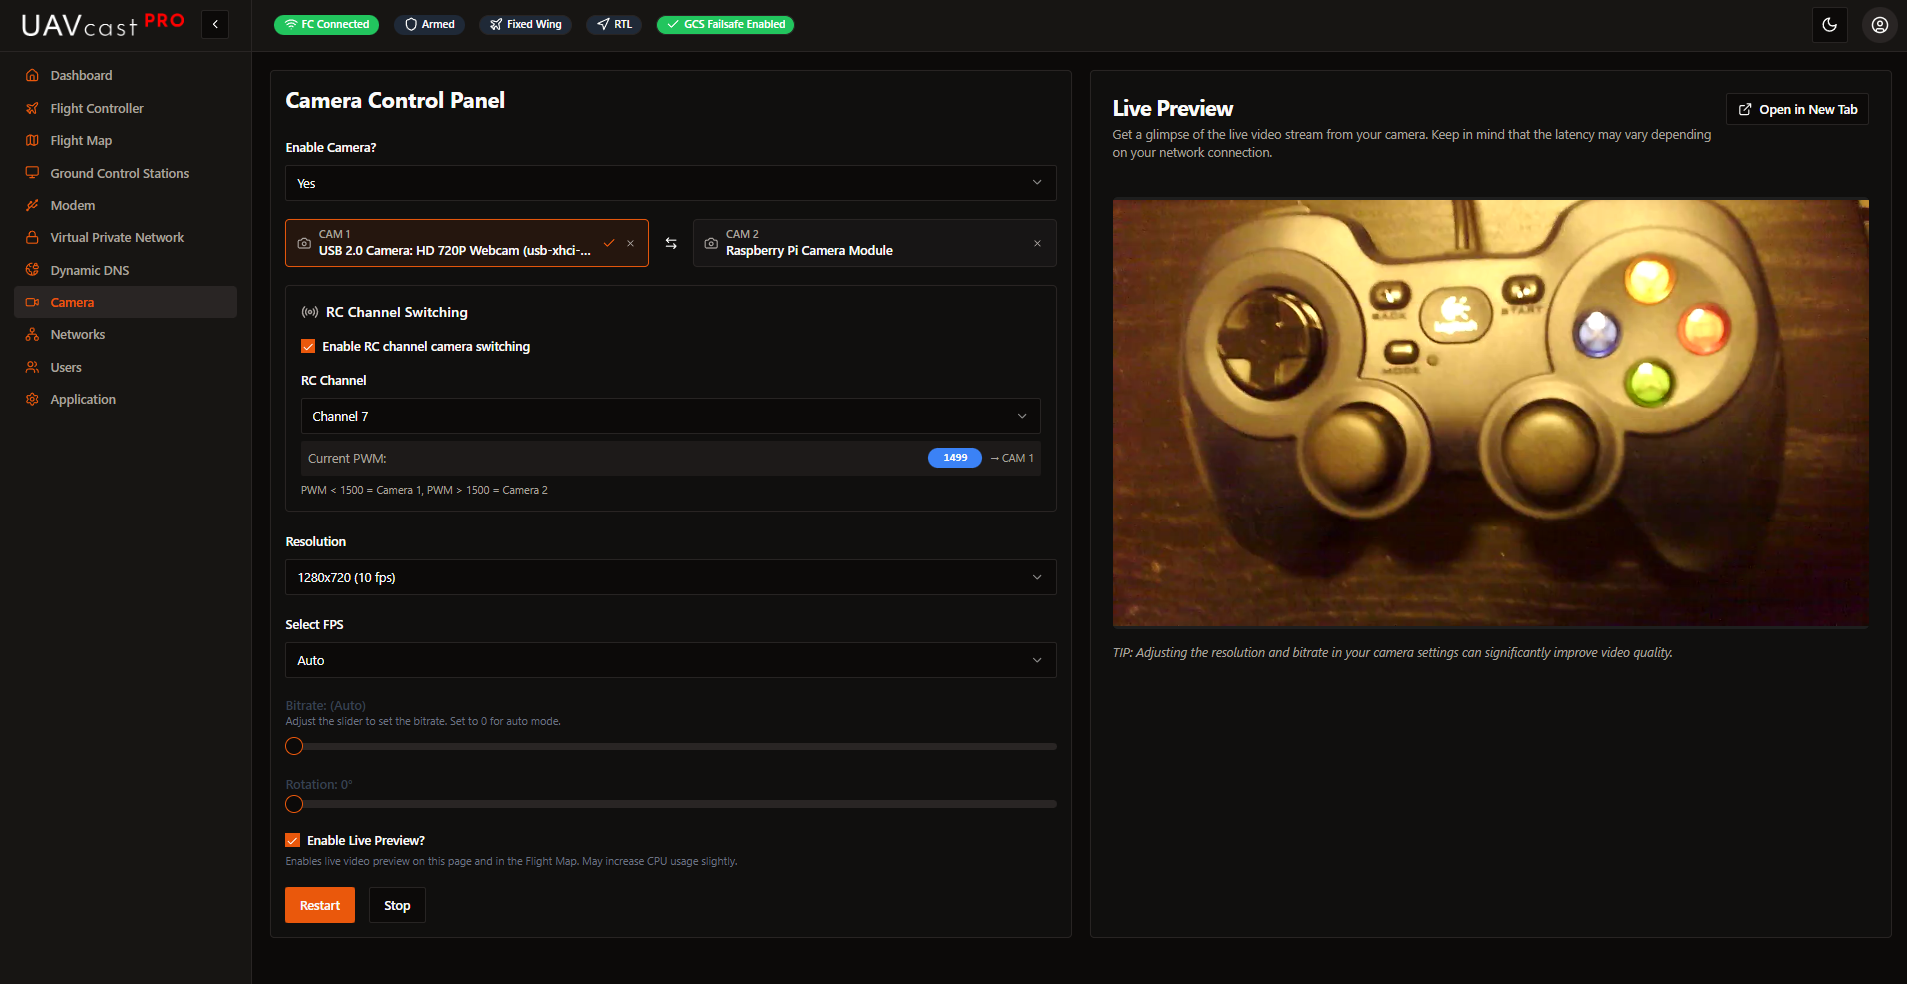
UAVcast-Pro streams video from Raspberry Pi cameras or USB cameras to your ground control station using GStreamer with H.264 encoding over UDP.
Supported Cameras
Raspberry Pi Camera
- Pi Camera Module v1/v2/v3
- HQ Camera
USB Cameras
- Logitech C615, C920
- Most V4L2-compatible cameras
Verify connected cameras: v4l2-ctl --list-devices
Video Settings
Resolution, frame rate, and bitrate options are automatically detected from your camera's capabilities.
For limited connectivity (4G), use lower resolution, 15 FPS, and 1000-1500 Kbps bitrate.
Pi Camera Options
- Rotation: 0°, 90°, 180°, 270°
- Flip: Horizontal or vertical mirroring
Multi-Camera
UAVcast-Pro supports two cameras with instant switching.
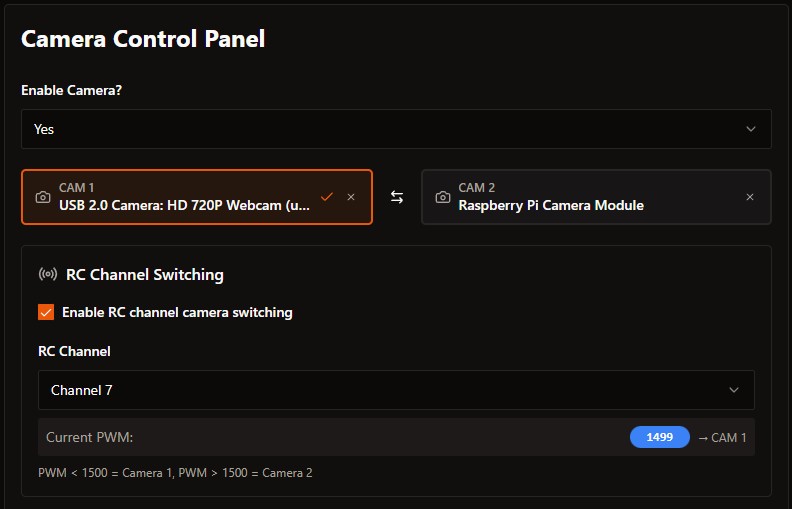
RC Channel Switching
Control camera selection from your transmitter:
- Enable RC Channel Switching
- Select RC channel (1-18)
- PWM threshold: < 1500 = Camera 1, > 1500 = Camera 2
Live Preview
The web interface includes an HLS preview powered by MediaMTX.
- Web preview (HLS): ~2-3 seconds latency - for setup/monitoring
- GCS stream (UDP): ~100-200ms latency - for flight operations
Custom Pipeline
For unsupported cameras or advanced configurations:
videotestsrc ! x264enc ! video/x-h264, stream-format=byte-stream ! rtph264pay ! udpsink host=192.168.1.100 port=5600
See GStreamer documentation for pipeline syntax.
Receiving Video
Mission Planner / QGroundControl
Both applications receive UDP video on port 5600 automatically.
- Configure GCS destination in Ground Control Stations
- Enable video for that destination
- Start camera in UAVcast-Pro
- Video appears in HUD
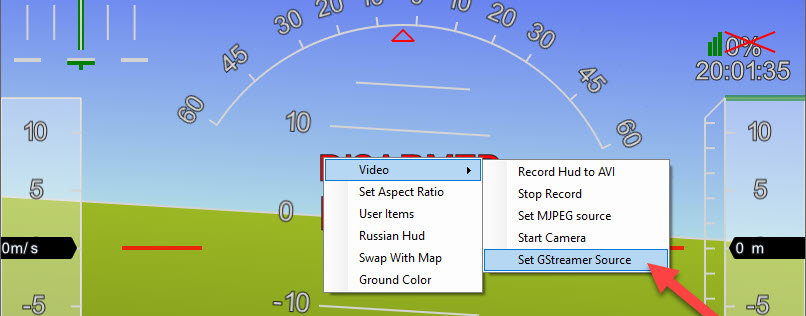
Custom GStreamer Source (Mission Planner)
Right-click HUD → Video → Set GStreamer Source
udpsrc port=5600 caps="application/x-rtp, media=video, clock-rate=90000, encoding-name=H264, payload=96" ! rtpjitterbuffer ! rtph264depay ! avdec_h264 ! videoconvert ! video/x-raw,format=BGRA ! appsink name=outsink
GStreamer (Windows)
Installation
- Download from gstreamer.freedesktop.org/download
- Choose MSVC 64-bit runtime installer
You must select "Complete" installation. Video will not work with Typical or Custom installation.
-
Open Command Prompt and navigate to GStreamer:
cd C:\gstreamer\1.0\msvc_x86_64\bin -
Run receive command:
gst-launch-1.0 -v udpsrc port=5600 caps="application/x-rtp, media=(string)video, clock-rate=(int)90000, encoding-name=(string)H264" ! rtpjitterbuffer ! rtph264depay ! avdec_h264 ! videoconvert ! autovideosink sync=false
Windows Helper Script
Save as start-video.cmd:
@echo off
cd /d C:\gstreamer\1.0\msvc_x86_64\bin
gst-launch-1.0 -v udpsrc port=5600 caps="application/x-rtp, media=(string)video, clock-rate=(int)90000, encoding-name=(string)H264" ! rtpjitterbuffer ! rtph264depay ! avdec_h264 ! videoconvert ! autovideosink sync=false
pause
GStreamer (Ubuntu)
sudo apt-get update
sudo apt-get install gstreamer1.0-tools gstreamer1.0-plugins-good gstreamer1.0-plugins-bad
Then run the same gst-launch-1.0 command.
GStreamer (Mac)
brew install gstreamer gst-libav gst-plugins-ugly gst-plugins-base gst-plugins-bad gst-plugins-good
Then run the same gst-launch-1.0 command.
Android
Install QGroundControl - video is received automatically on port 5600.
Troubleshooting
Camera Not Detected
Pi Camera:
libcamera-hello --list-cameras
sudo raspi-config  # Enable camera interface
sudo reboot
USB Camera:
v4l2-ctl --list-devices
No Video on GCS
- Verify GCS destination IP and port in Ground Control Stations
- Check firewall allows UDP 5600
- Test with
gst-launch-1.0command
Choppy Video
Reduce settings: 640x480, 15 FPS, 1500 Kbps