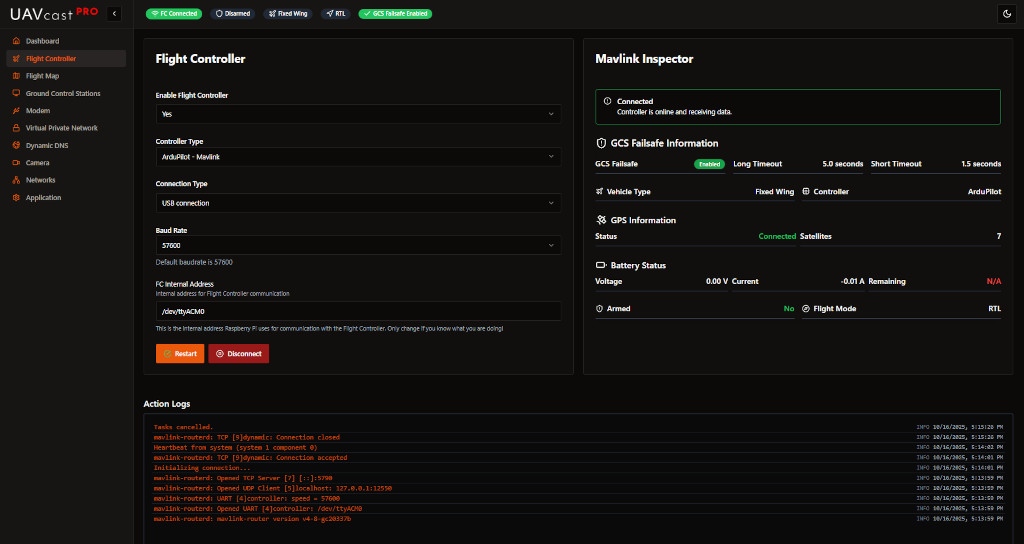
Flight Controller
The Flight Controller page allows you to configure the MAVLink connection between your Raspberry Pi and flight controller. UAVcast-Pro supports any MAVLink-compatible flight controller including Pixhawk, APM, Cube, and other ArduPilot or PX4-based systems.
Overview
UAVcast-Pro uses mavlink-routerd to manage MAVLink telemetry routing. This allows you to:
- Connect your flight controller via USB or Serial
- Route telemetry to multiple ground control stations
- Monitor connection health in real-time
- Configure baud rates and communication parameters
Connection Method
Choose how your flight controller connects to the Raspberry Pi:
USB Connection (Recommended)
-
Advantages:
- Plug-and-play, auto-detected
- More reliable connection
- No GPIO pin configuration needed
- Supports hot-plugging
-
Device Detection:
- Most flight controllers appear as
/dev/ttyACM0 - Some may use
/dev/ttyUSB0 - UAVcast-Pro auto-detects the correct device
- Most flight controllers appear as
USB is the recommended connection method for most setups. It's more reliable and easier to configure than Serial/GPIO.
Serial/GPIO Connection
-
Advantages:
- Saves USB ports
- More compact physical setup
- Direct hardware connection
-
Requirements:
- Connect flight controller TELEM port to Raspberry Pi GPIO:
- TX (Flight Controller) → RX (GPIO 15, Pin 10)
- RX (Flight Controller) → TX (GPIO 14, Pin 8)
- GND → GND (Pin 6 or any ground pin)
- Enable serial port in Raspberry Pi configuration
- Disable serial console (if enabled)
- Connect flight controller TELEM port to Raspberry Pi GPIO:
-
Device Path:
/dev/ttyAMA0(or/dev/serial0on some models)
Configuration Options
Baud Rate
- Default value:
57600 - Common options:
9600,57600,115200,230400,460800,921600
Select the baud rate that matches your flight controller's telemetry port configuration.
Common baud rates by flight controller:
- Pixhawk/Cube (ArduPilot): 57600 or 115200
- Pixhawk (PX4): 57600
- APM: 57600
- Modern flight controllers: Can support up to 921600
Higher baud rates (115200+) allow faster telemetry updates but require quality cables. Start with 57600 for reliability.
Internal Telemetry Address
This is the internal address UAVcast-Pro uses for routing telemetry.
- Default value:
127.0.0.1:14550 - Format:
IP:PORT
When to change:
- Advanced routing scenarios
- Custom MAVLink router configurations
- Integration with other onboard services
For most users, the default value works perfectly. Only change if you have specific routing requirements.
Enable Flight Controller
Toggle to enable or disable the flight controller service.
- Enabled: MAVLink router starts and telemetry is routed
- Disabled: Service stopped, no telemetry routing
Connection Status
The page displays real-time connection status:
- 🟢 Connected: MAVLink HEARTBEAT messages received
- 🔴 Disconnected: No HEARTBEAT detected
- 🟡 Connecting: Service starting up
What is Monitored:
- HEARTBEAT Messages: Confirms active MAVLink communication
- Message Rate: Number of messages per second
- System ID: Flight controller's MAVLink system ID
- Component ID: MAVLink component identifier
- Autopilot Type: Detected autopilot (ArduPilot, PX4, etc.)
Service Controls
Start/Stop Service
Control the MAVLink router service:
- Start: Begins telemetry routing
- Stop: Halts all telemetry communication
- Restart: Stops and starts the service (useful after configuration changes)
After changing baud rate or connection method, restart the service for changes to take effect.
Troubleshooting
No Connection / Red Status
Problem: Flight controller shows disconnected status
Solutions:
-
Check Physical Connection:
- Verify USB cable is securely connected
- Try a different USB port
- Use a quality USB cable (cheap cables can cause issues)
- For Serial: verify GPIO wiring is correct
-
Verify Baud Rate:
- Ensure baud rate matches flight controller configuration
- Check flight controller parameters (e.g.,
SERIAL1_BAUDin ArduPilot) - Try common rates: 57600, 115200
-
Check Device Path:
- For USB, verify device appears:
ls -l /dev/ttyACM*orls -l /dev/ttyUSB* - For Serial:
ls -l /dev/ttyAMA0or/dev/serial0 - Check kernel messages:
dmesg | grep tty
- For USB, verify device appears:
-
Flight Controller Configuration:
- Ensure telemetry output is enabled on the port
- Verify MAVLink protocol is selected (not MSP or other protocols)
- Check flight controller is powered and initialized
-
Service Status:
- Check if mavlink-routerd is running:
sudo systemctl status mavlink-manager - View system logs:
journalctl -u mavlink-manager -f
- Check if mavlink-routerd is running:
MAVLink Protocol Versions
UAVcast-Pro supports:
- MAVLink v1: Legacy protocol
- MAVLink v2: Modern protocol with signing and extensions
The router auto-detects protocol version.
Best Practices
- Use USB Connection for simplicity and reliability
- Start with 57600 baud and increase if needed
- Test connection before flight using the status indicator
- Monitor logs if experiencing connection issues
- Keep cables short (< 1 meter for USB)
- Use quality cables - cheap cables cause signal integrity issues
- Secure connections - vibration can disconnect loose cables
Related Pages
- Ground Control Stations - Configure telemetry destinations
- Dashboard - Monitor flight controller status
- Flight Map - View live telemetry on map
- Troubleshooting Guide - Common issues and solutions
Next Steps
After configuring your flight controller:
- Verify connection status shows 🟢 Connected
- Configure Ground Control Stations to route telemetry
- Set up VPN for remote access
- View live telemetry on the Flight Map